Quick answer
A van electrical system is three budgets that have to balance: your daily watt-hours (the load list), your roof’s watts (typically 200–400W of panel on a standard van), and your charging sources (solar + alternator + shore). Size in that order — most van-build mistakes are buying hardware before finishing the load list. The two decisions that shape everything: 12V-first design (skip the inverter losses where you can) and whether your battery needs to charge through freezing nights (vans get cold inside; that decides heated vs base-model lithium). This page runs a real worked example — including what Starlink actually costs you in watts — with nothing tested by us, just spec math you can re-run with your own numbers.
Step 1: the honest load list (with Starlink measured, not guessed)
Internet is the load that quietly sizes modern van builds, so use real numbers (Starlink’s official specs: Mini averages 20–40W, Standard 75–100W, idle ~15–20W; retrieved 2026-09-06):
| Load | Typical draw | Hours/day | Wh/day |
|---|---|---|---|
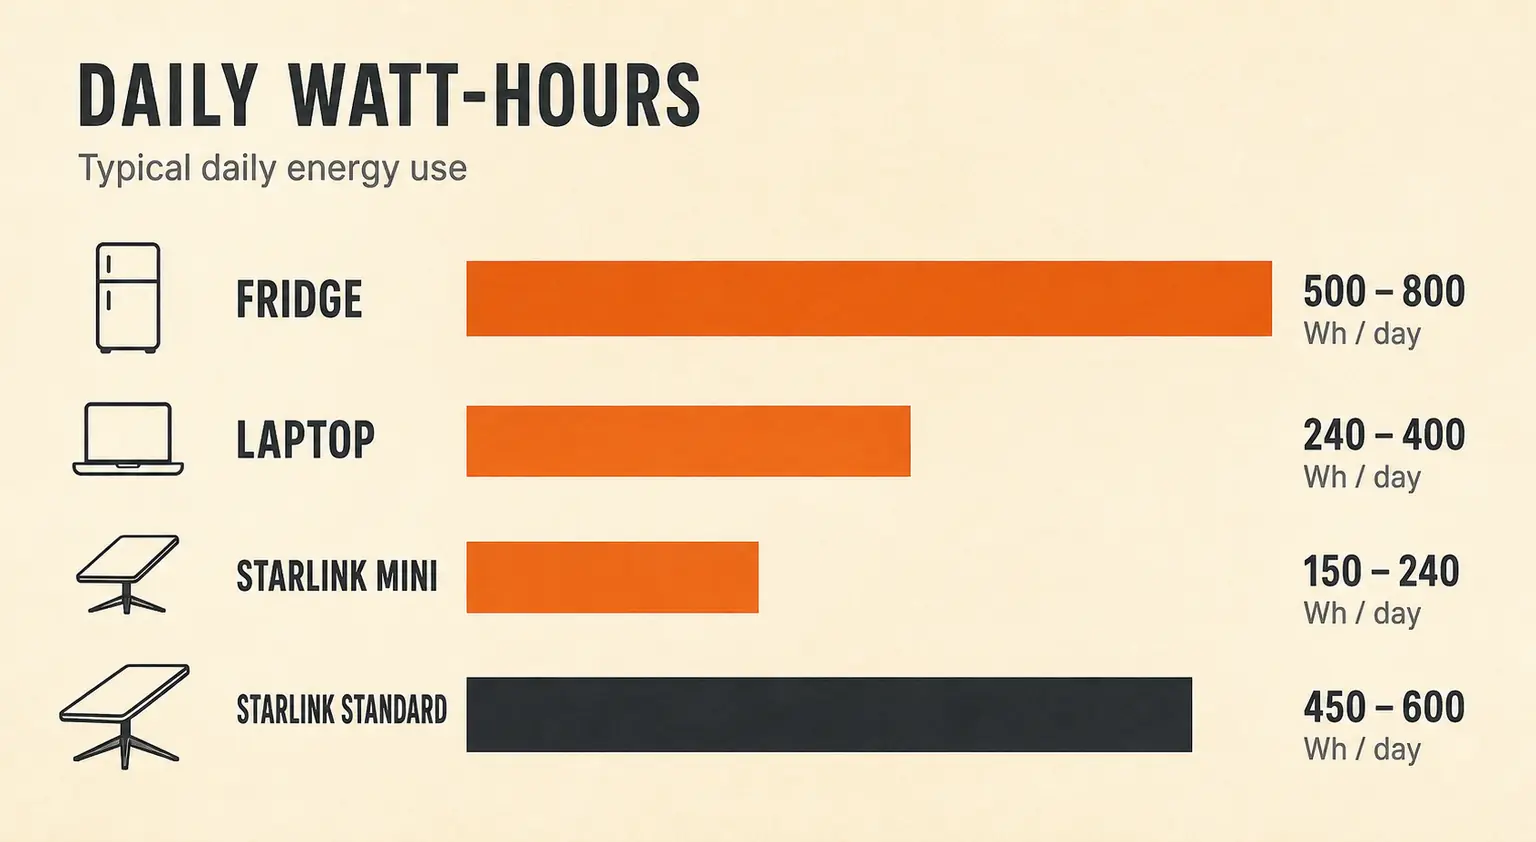
| 12V compressor fridge | 40–60W avg (cycling) | 24 | 500–800 |
| Roof vent fan (variable) | 15–50W | 8 | 120–300 |
| LED lighting | 10–25W | 5 | 50–125 |
| Water pump (12V diaphragm) | 50–80W (intermittent) | 0.5 | 25–40 |
| Laptop + phone charging | 60–100W | 4 | 240–400 |
| Starlink Mini | 20–40W (25W typical real-world) | 6 | 150–240 |
| Starlink Standard instead | 75–100W | 6 | 450–600 |
| Induction/heat* (if 120V life) | 1,200–1,800W | 0.3 | 360–540 |
| Realistic 12V-first total | ~1,100–1,900Wh/day |
*Cooking on electricity changes everything: add ~400–600Wh/day and force an inverter into the build. Most considered builds keep a propane/ diesel route for heat and cooking — the load calculation guide has the full worksheet.
The Starlink decision alone is worth ~300–450Wh/day (Mini vs Standard, per official specs and owner-measured reports — real-world Mini runs ~20–25W after connection). That’s the difference between one 100Ah battery being enough and needing two.
Step 2: what the roof can actually make
A standard high-roof van fits roughly 200–400W of panels (2–4 × 100W-class, or ~2 × 175–200W) depending on rack, vent, and AC clearance. What that yields:
- Good conditions (sunny, panel flat on roof): ~4–5 sun hours × 300W × ~0.8 system efficiency ≈ 1,000–1,200Wh/day.
- Winter or parked-in-forest conditions: half that or worse — see peak sun hours and be honest about shade; a flat roof panel in December makes a fraction of its summer figure.
- Flat mounting (the van default) loses tilt angle — panels nailed flat sacrifice ~10–15% annually vs tilted, more in winter. Adjustable mounts recover some of it when you’re parked.
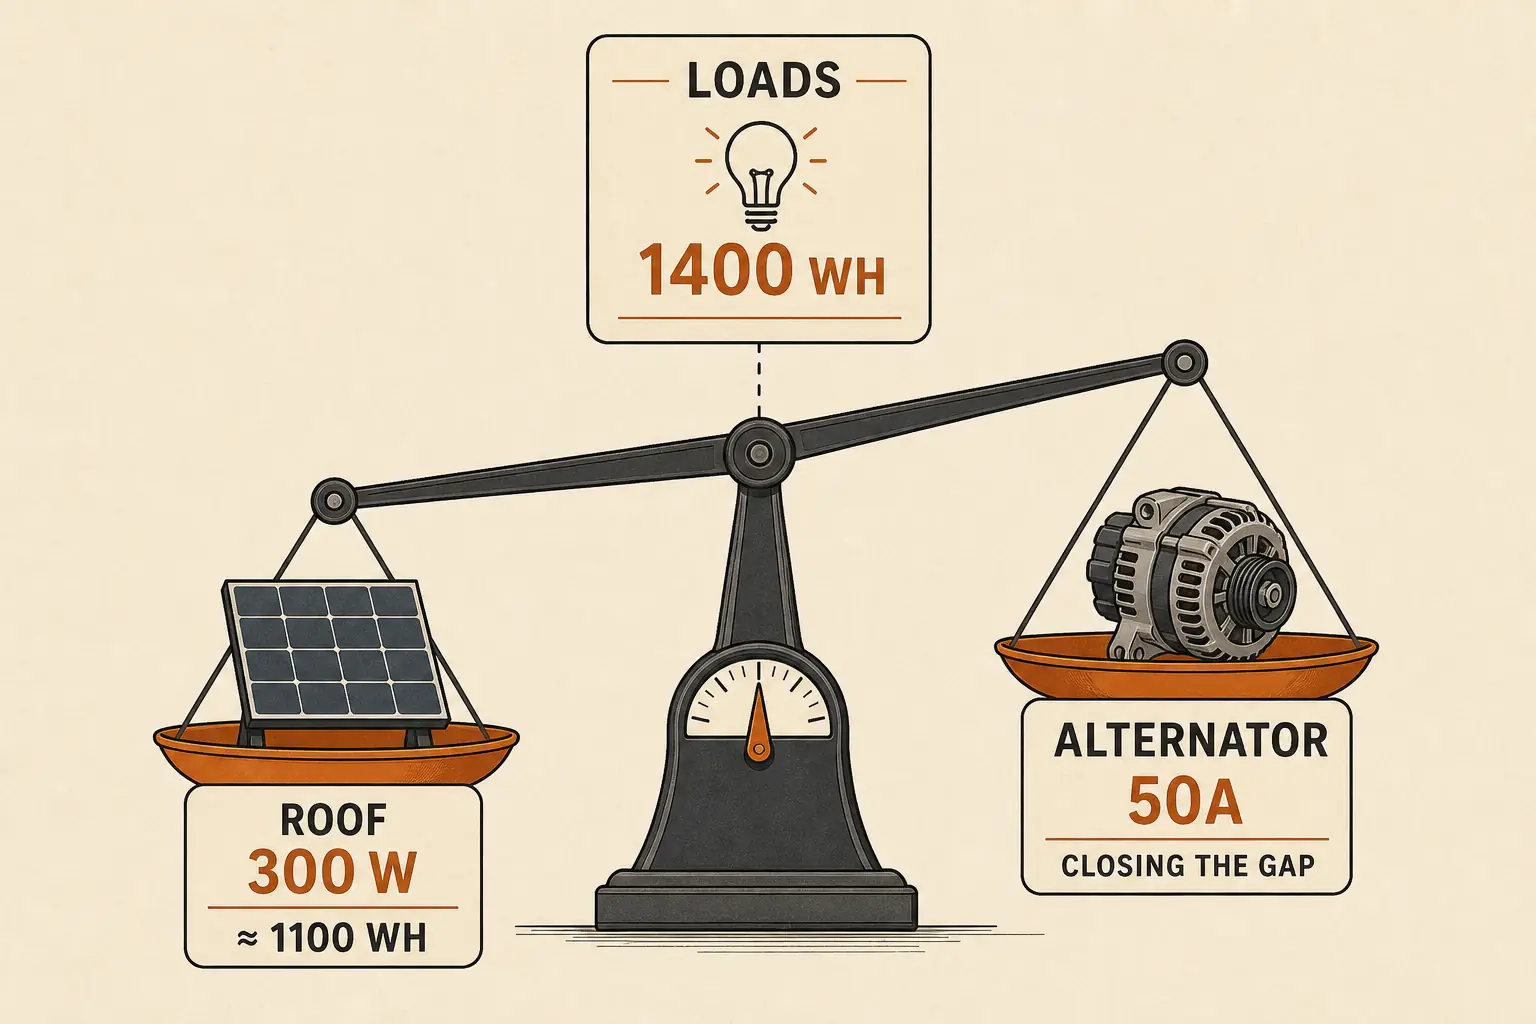
Compare to the load list: a 1,100–1,900Wh/day build on 1,000–1,200Wh/day of solar does not close on sunshine alone. That’s not failure — that’s what the alternator is for.
Step 3: the battery (with winter in mind)
Vans are unheated metal boxes overnight — exactly the cold-charging problem. If you’ll camp below freezing and charge from solar mornings:
- Base 100Ah LiFePO4 (like the one in our LiTime review): fine if your charging happens while driving (alternator warmth + cabin heat) or you accept cutoff behavior in cold snaps.
- Self-heating 100Ah (LiTime Group 24 self-heating, Redodo self-heating — the cold-charging guide has the verified warm-up math): the right call if the van sits outside in winter and relies on solar.
- Capacity math: 2 × 100Ah = 2,560Wh at 12.8V nominal; at 80% usable × 90% wire efficiency ≈ ~1,880Wh practical — one full day of the heavy load list, two of the light one.
Bank voltage: 12V is the van default (every appliance exists in 12V; see 12V vs 24V vs 48V for when it isn’t).
Step 4: the alternator is a charging source (use it deliberately)
Driving is your most reliable winter charger. A DC-DC charger (not a plain isolator — modern vans have smart alternators that isolators can’t track) charges the house battery from the alternator at a controlled rate:
- The current reference unit: Victron Orion XS 12/12V 50A (700W) — smart-alternator compatible, lithium profiles, Bluetooth configuration, IP65 (per manufacturer documentation and manual, retrieved 2026-09-06). 50A × ~14V ≈ 700W of charging while driving; a 2-hour drive puts ~1.4kWh into the bank.
- Check your alternator’s spare capacity before maxing the charger (50A is fine on most vans; verify against your vehicle’s specs).
- Shore charging and a small inverter-generator remain the third and fourth options — the battery vs generator tradeoffs apply at van scale.
Step 5: controller, fusing, wiring (the parts that keep it alive)
- Controller sizing: array watts ÷ battery volts × 1.25 ≤ controller amps (the charge controller sizing page works it in full). 400W on 12V → ~39A → a 40A MPPT (our controller guide covers the honest picks; MPPT-vs-PWM threshold math is here).
- Every segment fused: panel-to-controller, controller-to-battery, battery-to-distribution, alternator line — the fuse and breaker sizing page is the worksheet. In a metal box on moving wheels, this is the page you don’t skip.
- Wire for the inverter run: if you do add 120V, the inverter cable chart and battery cable sizing prevent the classic van fire-starter.
- Monitor: a shunt-based battery monitor is the difference between managing and guessing — the math is in the BMS/monitoring guide.
The worked build (one honest example)
Load list lands at 1,400Wh/day (fridge + fan + lights + laptop + Starlink Mini at 6h). Roof takes 300W flat. Solar delivers ~1,000–1,100Wh/day in decent weather — the gap closes with one 2-hour drive per few days through a 50A DC-DC charger. Bank: 2 × 100Ah LiFePO4 (self-heating if winter-bound). Controller: 40A MPPT. Total: a system that runs indefinitely with movement, indefinitely in summer sun, and honestly needs a shore/generator top-up in a parked winter week. That’s the real answer no component catalog gives you — the arithmetic does.
Build order (so you don’t buy twice)
- Load list (worksheet in the calculation guide)
- Battery capacity + chemistry-with-winter decision
- Charging sources: roof watts → controller; alternator → DC-DC
- Distribution: fusing, busbar, monitor
- Inverter last, only if the load list demands 120V
Frequently Asked Questions
How much solar do I need for a van conversion?
Can I run Starlink on van solar?
Do I need a DC-DC charger or is a battery isolator enough?
Should my van system be 12V or 24V?
Will my lithium battery be OK in the van over winter?
Next logical reads
RV solar sizing (the sibling system) How to calculate your solar load 12V vs 24V vs 48V LiFePO4 in freezing weather Fuse and breaker sizing
Charges the house bank from the van's alternator at a controlled 50A (700W) — smart-alternator compatible, lithium profiles, Bluetooth configuration, IP65 (per manufacturer documentation, retrieved 2026-09-06). Not for: vehicles without spare alternator capacity for 50A — verify your van's numbers and consider the smaller Orion if marginal. The honest tradeoff: it's the priciest part of the charging trio, and also the one that makes winter and forest camping work — solar alone doesn't close a 1,400Wh/day gap.
Check price on Amazon (opens in a new tab) Price & availability shown on Amazon.com — we may earn a commission.